Motivated through Part 1 of this series, filtration of brewing water can vastly improve your brewing, often through the use of reserve osmosis (RO) water. While RO water can be easily purchased at corner stores and/or home delivered, apartment home dwellers, especially those living in dense urban centers, may find access to RO water limited/cumbersome and home delivery on the pricey side. For me, the standard 5 gallon haul of RO water up three flights of stairs to my apartment was a constant de-motivational factor in my homebrewing. Thus, in July of last year (2015), I discovered to my personal delight a small, apartment-compatible RO filtration system through APEC Water with the hope it might alleviate this constant water/brewing problem. Now, after almost a year of constant use, I’ve been able to thoroughly test the performance and learn the ins-and-outs of this small RO system with respect to my homebrew. Thus, in part 2 of the Apartment Brewing Tech RO water series, I’ll provide a detailed overview, instruction, and review of the APEC Water RO Countertop (model ID: RO-CTOP) system for its potential use in your apartment (and general) homebrewing. Cheers and happy brewing!
TL;DR summary: It works very well! Pros: small footprint, less than 10 ppm TDS filtration over year of use. Cons: very slow, a bit pricey.
Quick reader note: This post was NOT sponsored by APEC Water. This review is solely my personal views/thoughts/opinions/experiences. Cheers!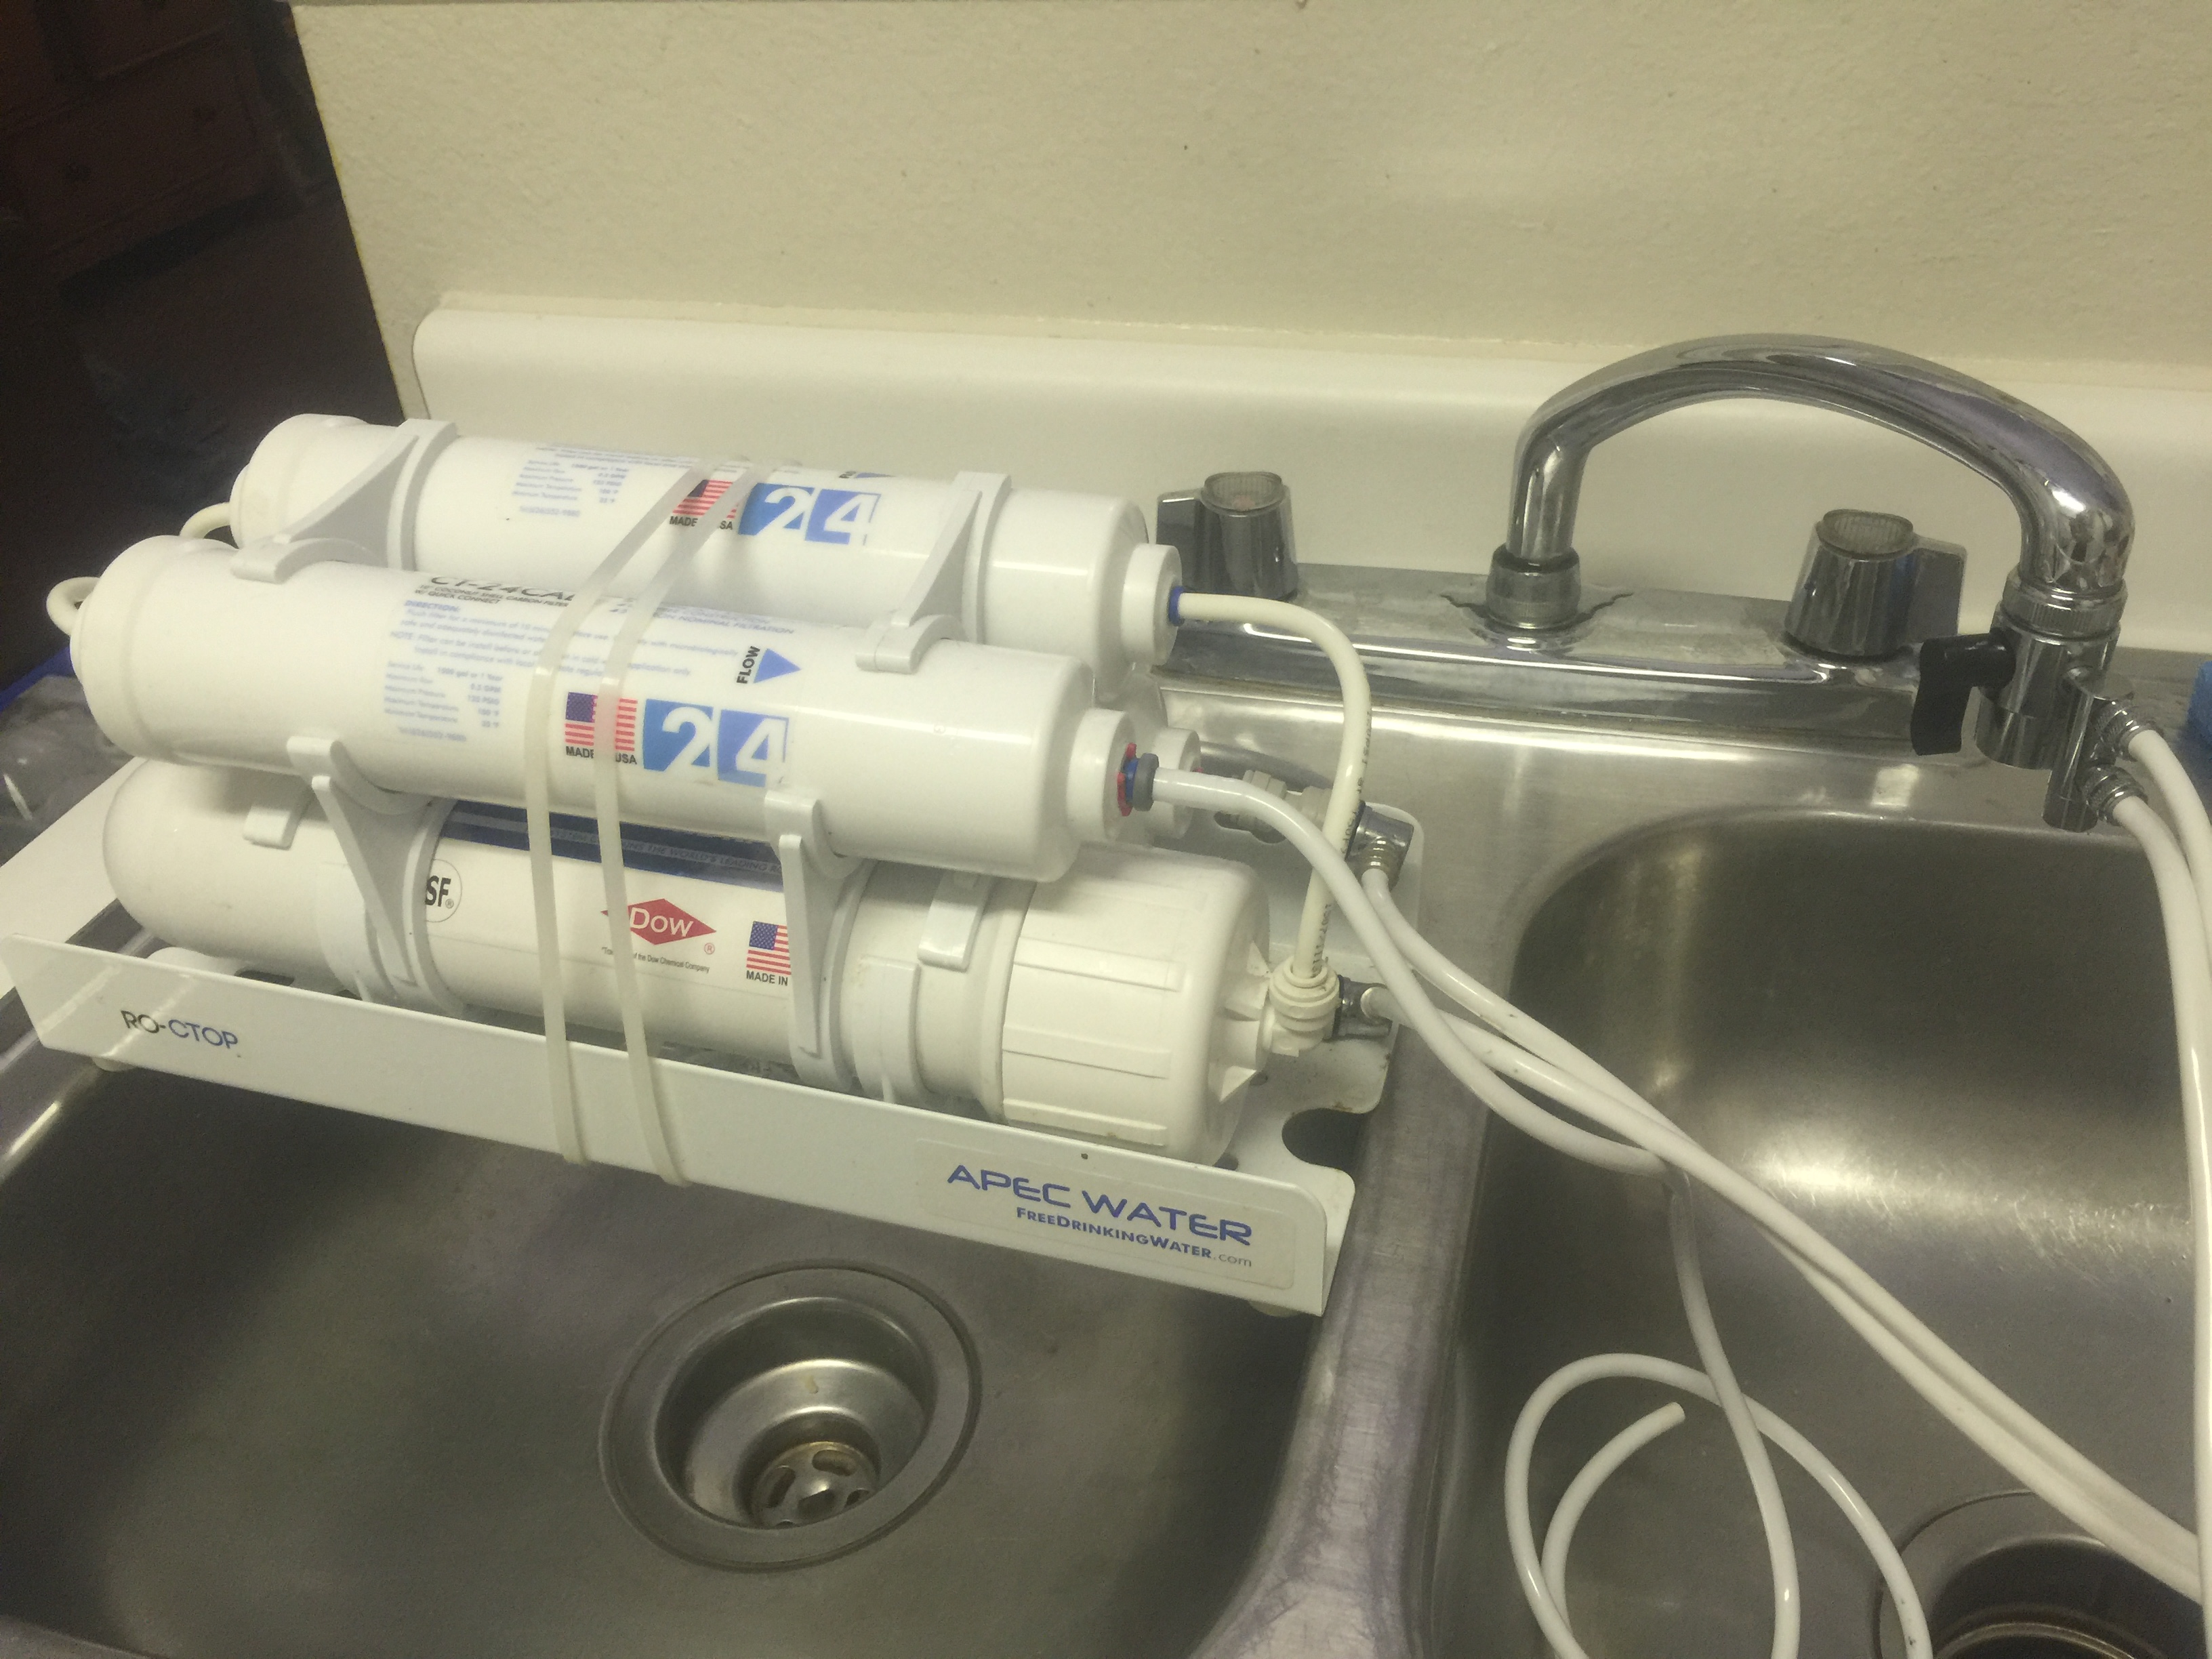
The APEC Water RO-CTOP Design
Without going into too much info on RO filtration science/tech (that’s for another post), RO systems in the most basic form typically consist of a 4 to 5 stages to achieve the low total dissolved solids (TDS for short, essentially the amount of mineral ions in the source water, usually reported in ppm) in RO filtered water while also prolonging the life of your RO membranes. For the APEC Water RO-CTOP system, it employs a four stage filtration cycle: two pre-filters (a 5-micron and activated carbon filter), a third stage RO membrane (Dow Filmtec-brand high rejection membrane), and, last but not least, a fourth activated carbon post-filter. As a result of this staging as we’ll see later in the performance section below, the APEC Water RO-CTOP system is able to produce RO water with less than 10 ppm TDS starting from local Austin water (off the tap has ~170 ppm).
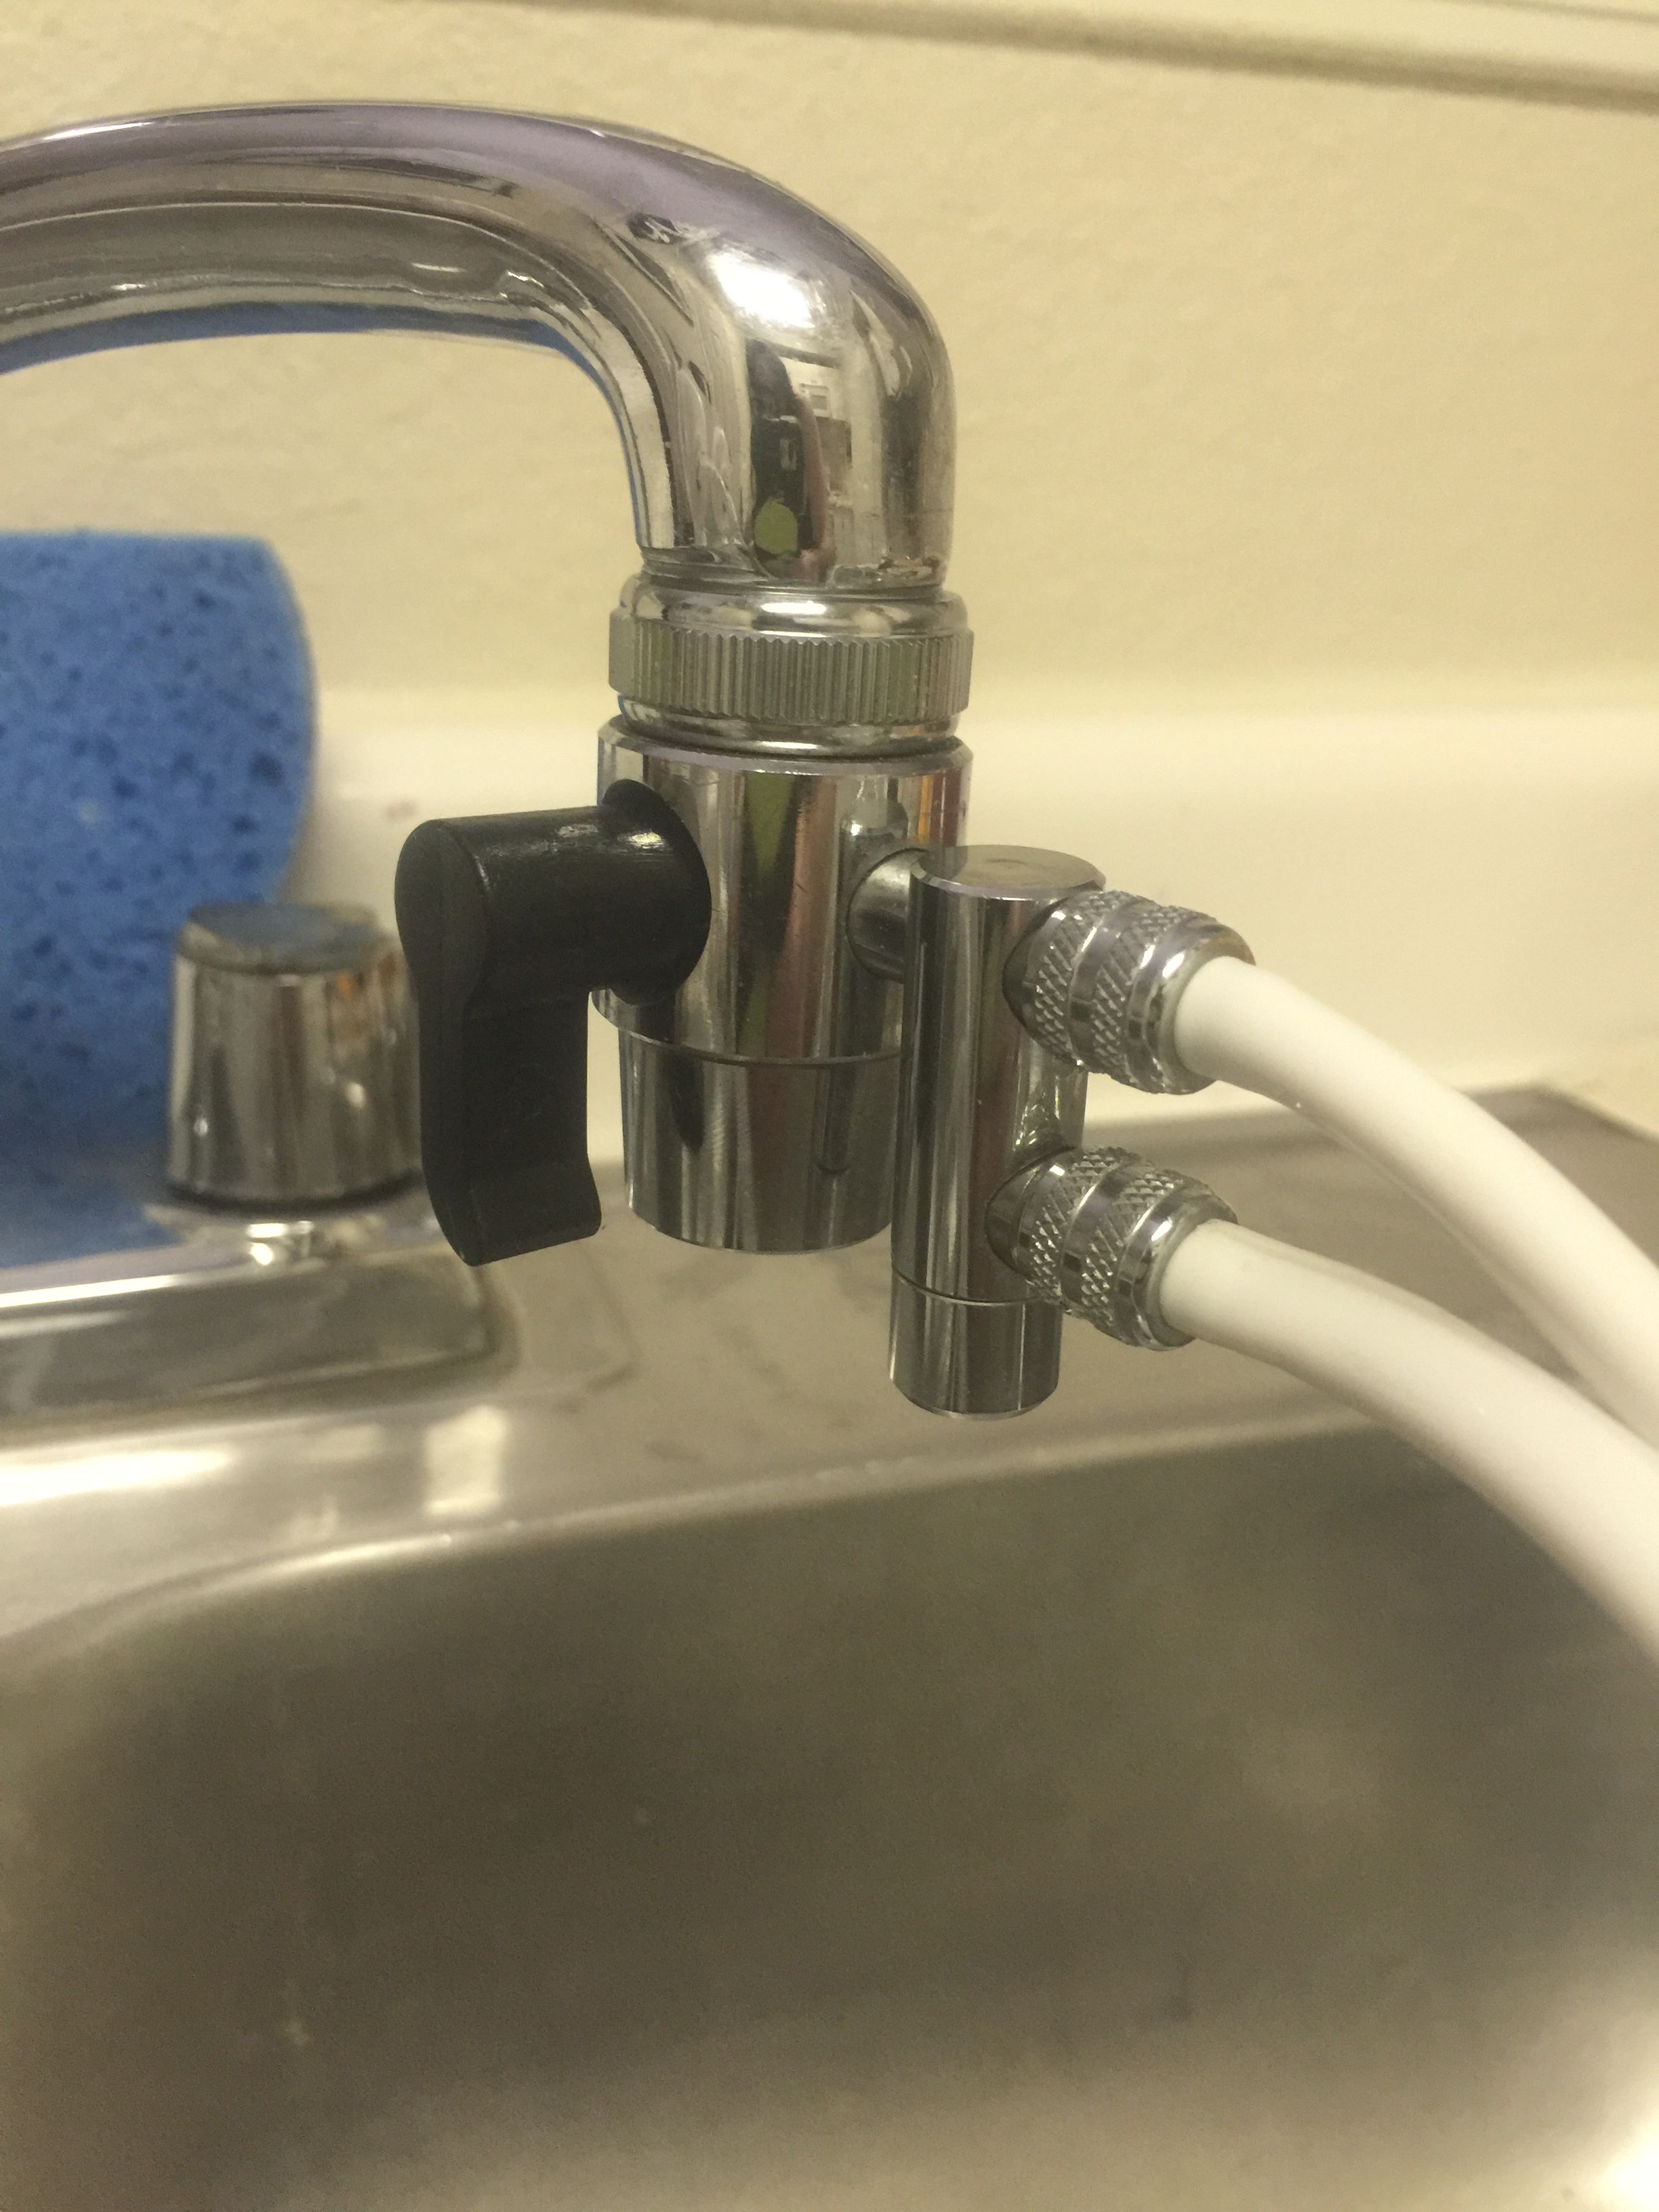
Beyond the filtration system, the main feature of the RO-CTOP system which differentiates itself from similar under-the-sink RO models is its integrated faucet adapter. Specifically, the faucet adapter perform three key duties in the filtration process: (1) interface with your native faucet threading (2) valve bypass between tap water and RO filtration and (3) exhaust brine water. Starting from (1), the faucet adapter is designed to directly connect to 13/16″ male threads, common in kitchen sink faucets. If this is not standard in your kitchen (or brew area), the APEC system comes with typical faucet thread adapters, which is a plus. On point (2), APEC designed the faucet adapter as a valve. By actuating the black levels on the side, it diverts the flow of tap water either through an aerator for typical faucet use or into the filtration system. The integrate aerator is a plus since it helps to conserve water use much like standard faucet fittings while keep the RO filtration semi-permanently attached to your faucet . Lastly on point (3), the faucet adapter exhausts the brine water (water consisting of a majority of the TDS filtered by the RO membrane) through a small hole at the faucet adapter head. This feature is non-standard compared to under-the-sink RO models since these systems typically exhaust brine water waste directly into the drain piping. However, since this system exhausted out the faucet adapter head, the brine water can be reclaimed if desired and utilized for other purposes (like cleaning) for those looking to reduce water waste and generally be environmentally savvy.
Last but not least, the newly filtered RO water exits the filtration system via long narrow tube much as expected. The tube that come with APEC system isn’t very long, so (obviously) if it needs to increase is size, this can be easily modified to suit your particular needs. In my case, I set the carboy as close to my kitchen counter as possible, often with a funnel in the carboy for safe measure, all of which works for my brewing needs.
Using the APEC Water RO-CTOP System
Installation and use of the APEC countertop RO system is intuitive and easy to use. In fact, this section is mostly not necessary since the unit comes with instructions (obviously). However, since I’ve been using this system consistently over a year, I have acquired some useful tips/tricks/general advice for future APEC Water RO-CTOP users that I thought was worth mentioning here. Thus, the following is a short how-to guide.
Installation
- Remove native faucet attachment. Basic faucets usually have an aerator that needs removing. When looking from above, it should unthread with clockwise rotations. If any aerator/attachments have never been removed in the history of the faucet, it may be a bit tight/stuck on. Consider de-mineralize it using vinegar/CLR solution if this is the problem. If all else fails, vice grips!


- Attach the RO system faucet adapter. Depending on your faucet type, you may require a faucet thread converter. Fortunately, the APEC system comes with some common faucet type adapters. If none work, likely consult your local homebrew supply store.
- Align the faucet adapter and make sure it’s threading correctly when tightened. The bulk of the faucet adapter makes it difficult to tell if the threads are aligned properly, so double check before really tightening down and avoiding f’ing your faucet and its threads.
- Lastly, one last installation tip (although slightly silly). Use a nutcracker (no, not the decorative type) to help tighten/loosen the faucet adapter. Since I hardly use these contraptions to open tree nuts, it makes as a great multitasker for tightening/loosening the faucet adapter attachment.
Operation
- With faucet adapter installed, turn on tap water and rotate the black level on the side of the faucet adapter to the horizontal orientation to activate RO filtration. Make sure you only use cold tap water as warm/hot tap water will foul the filters.


- Next, check the water lines/faucet adapter to make sure there are no leaks. Also, arrange/inspect them to ensure none of the water lines are crimped/bent as empirically (sad voice of experience) this will slow filtration. Similarly, check to make sure the brine water exit is flowing and unobstructed and the RO water is flowing. This may take a minute.
- Once running, let the system run a few minutes before collecting since initial runoff typically has a higher concentration of dissolve solids. This is only really important is you need ultra-low TDS for your homebrewing. Since I don’t like to waste water, I just start collecting it after a few second of runoff.
- Set a timer for approximate fill time as a reminder to avoid overfilling your container and spilling RO water all over the floor. Better yet, buy yourself some insurance and place any containers/carboy in a tub/plastic tote to capture any overflow if forgetful. Since I’m the latter, plastic tote technology has avoided this scenario a few times (and kept my kitchen floors and downstairs neighbors from a wet mess).
- With RO water collected, turn the black level vertically (parallel to the faucet adapter) and turn off the tap water. Also, upon finishing, I usually cap off the RO hose.
- Lastly, if faucet adapter removal is desired, just follow the installation directions above in reserve order.
Performance and Cost
There are many metrics to evaluate the performance of RO filtration systems, but for our purposes (as apartment homebrewers), we’ll consider just 4 variables: filtration efficiency (how much TDS is removed from the source water), fill rate (how fast in time is a gallon of RO water produced), size/weight (since we need a small footprint), and cost (since we wouldn’t want to spend too much).
Filtration efficiency: <10 ppm TDS (starting from 170 ppm TDS) almost 100%


Notes: Fresh from the source, my local Austin tap water averages around 170 ppm TDS. Running it through the RO system, we can see the filtered water measures at 0 ppm TDS. Since the resolution of my TDS meter is 10 ppm TDS, I’m not really comfortable saying it’s actually 0 ppm TDS, rather somewhere less than 10 ppm. Still, the result is positive. Also, in checking the brine, we see it has 250 ppm. Quickly, one may think ‘shouldn’t it be 340 ppm?’, i.e. double the source. At the surface this seems reasonable; however, the brine water usage is at a higher flow rate than the RO water, resulting in a dilution of the brine TDS.
Measurement note: Measurement of TDS is easy, all you need is an TDS meter. In fact you may already have one. Often they come attached with pH meter, like mine here. If not, standalone TDS meters are fairly inexpensive, usually around ~10-20 US dollars.
Fill rate: time to fill 5 gallon carboy ~95 minutes (~19 minutes/gallon)
Notes: The manual specs the maximum fill rate at 16 minutes per gallon for line pressure of 90 psi. While I have not calibrated my faucet for water pressure, I would expect a slightly reduced fill rate level simply because the water in my kitchen faucet must travel up three stories to my third floor apartment, losing some water pressure along the way. So overall this fill rate meets expectations.
Size & Weight: 5 (width) x 6 (height) x 14 (length) inches, 7 lbs dry
Notes: not much to say here, other than its small size is a perfect fit for cramped countertops.
Upfront & Life-cycle Costs: ~210-250 US dollars new with filters, ~20/pre-,post-filter, 75/RO membranes US dollars with replacement time varied between 1-5 years
Notes: The APEC Water RO-CTOP system is generally affordably priced. The APEC Water website states it retails for 355 US dollars,; however, empirically, it can usually be found in the 210-250 US dollar range. The starter kit usually consists of 1 complete set of filter (already installed), faucet adapters, tubing, etc.. Also, no installation of the first filter set is required (a plus). On replacement filters, the cost depends on the filter type. The pre- and post-filters run around 20 US dollars with the first two stages lasting about a year and the last stage about 3-5 years. The RO membrane lasts long about 3-5 years depending on usage and run about 75 US dollars in replacement.
APEC Water RO-CTOP System Summary
Overall, from its demonstrated performance, small footprint, and ease of use, I’m incredibly happy with this RO system. Homebrew-wise, since I’ve been a frequently user of RO before this system, I haven’t notice any difference between store-bought and home-filtered RO water (mash pH, flavor/character etc.) which is a positive (if not an as-expected null result). More so, this purchase was tailored for convenience of not having to haul a full 5 gallon carboy from my local grocery store up 3 flights of stairs while gaining access to RO water whenever necessary. Also, this RO system is relatively/moderately affordable ~200 US dollars especially compared to some of the new-to-market homebrew-oriented mobile RO systems which can command 300+ US dollars price tag. While it does take some time to filter (~18-20 min/gallon from my top floor apartment), I can afford the patience given that the system beautifully met the above mentioned requirements. Because of the lengthy wait time, I usually pre-game the day before brew day and fill my RO carboy(s) as needed.
TL;DR pros
- portable/small footprint size (a major point of this series)
- generates very pure RO water (for my source water less than 10 ppm of TDS)
- low cost replacement filters (~20 US dollars for per pre/post filters which last for ~1 year/ ~75 US dollars for RO membrane which lasts up to 5 years)
- reclaimable brine water (for the environmental savvy)
TL;DR cons
- a bit pricey (~230 US dollars initial investment)
- very slow (~95 minutes to fill a 5 gallon carboy from my third floor apartment)
Do you use RO water in your homebrewing and/or do you have an RO system? Leave your experiences in the comment section below. As always, cheers and happy brewing!
If you liked this post, check out my other apartment brewing tech posts (linked here)!
Follow me on Facebook, Twitter, and Instagram!
Facebook: https://www.facebook.com/The-Apartment-Homebrewer-298322327011972/
Twitter: https://twitter.com/apthomebrewer
Instagram: https://www.instagram.com/apthomebrewer
Check out my book: The Idiot’s Guide to Homebrewing!
IG: Homebrewing: [Amazon link] & [Blog post on background info, the book writing process, content, and contributors]
